Android 学习笔记 - Service
Service 是 Android 中实现程序后台运行的解决方案,它的存在不依赖于任何用户界面。
尽管如此,Service 在创建时仍然依附于创建它的应用进程,如果这个应用进程被杀掉,那么所有依赖于这个进程的 Service 也会停止工作。虽然 Service 是后台运行,但是其并不会自主开启线程,所有的代码默认仍然运行在主线程中。
使用 Service
想要使用 Service ,就需要新建一个类去继承Service类,这个操作可以通过 Android Studio 来快捷执行。创建好 Service 后可以重写以下几个方法:
onCreate():这是最先接收到的回调,在 Service 创建的时候调用。onStartCommand(intent: Intent?, flags: Int, startId: Int):在 Service 每次启动的时候调用。如果只需要绑定 Service ,那可以不实现这个方法。onBind():当其它组件需要和 Service 进行绑定时,会调用bindService(),这个方法会回调onBind(),onBind()会提供一个 IBinder 接口,该接口用于在绑定的组件和 Service 间进行通信。如果onBind()返回null则表示 Service 不希望被绑定。onDestroy():用于清理资源,是 Service 接收的最后一个回调,在 Service 销毁的时候调用。
Service 在创建好后同样需要在AndroidManifest.xml中注册,只不过如果这个 Service 是通过 Android Studio 快捷创建的话,那么 Android Studio 会自动帮忙完成注册。接着可以通过startService()和stopService()来启动和停止 Service ,这两个方法都是定义在 Context 类中的,所以可以直接在 Activity 中调用。另外也可以在 Service 中调用stopSelf()来自我停止运行。
从 Android 5.0 API 21 开始,如果往bindService()中传入隐式 Intent 会导致系统抛出异常,所以启动 Service 时应始终使用显式 Intent 。
可以在AndroidManifest.xml的<service>标签内通过android:description来为该 Service 添加一个简短的描述,告知用户 Service 的用途,避免用户因为不信任而终止 Service 。
使用 IntentService
IntentService是Service的子类,相比 Service 它更适用于单线程的场景。想要使用 IntentService 只需新建一个类去继承IntentService,然后重写onHandleIntent()即可。IntentService 使用工作线程逐一处理所有启动请求,onHandleIntent()会接收每个启动请求的 Intent ,以便执行后台工作。IntentService 具有以下特点:
- 在处理完所有启动请求后自动终止,因此不必调用
stopSelf()。 - 提供
onBind()的默认实现(返回null)。 - 提供
onStartCommand()的默认实现,可将 Intent 依次发送到工作队列和onHandleIntent()实现。 onHandleIntent()中的操作默认位于子线程中,无需担心出现 ANR 。
在继承IntentService的时候需要调用其构造函数并传入一个字符串参数,这个字符串将作为工作线程的名称。如果还要实现其它的回调,例如onStartCommand(),则必须要调用父类的方法(onBind()除外),只有这样 IntentService 才能正确处理工作线程的生命周期。
1 | |
1 | |
在 Activity 中构建了一个显示 Intent 并为其添加了一个字符串消息,随后调用startService()并将这个 Intent 传入用于启动 Service 。接着在 Service 里重写了onHandleIntent()和其它两个生命周期相关的方法。运行程序,在 Activity 中的startService()执行后,将在日志中相继看到这些输出:
Service started.
Sleep over.
Extra info is: Hello
Service destroyed.
按照前面所说,onDestroy()会自动执行。
onStartCommand()返回一个整型数据,这个整型数据必须是以下 3 者之一:
START_NOT_STICKY:如果系统在onStartCommand()返回后终止 Service ,则除非有待传递的挂起 Intent ,否则系统不会重建 Service 。START_STICKY:如果系统在onStartCommand()返回后终止 Service ,则其会重建 Service 并调用onStartCommand(),但不会重新传递最后一个 Intent 。除非有挂起的 Intent 要启动 Service ,否则系统会调用包含空 Intent 的onStartCommand()。在此情况下,系统会传递这些 Intent 。此常量适用于不执行命令、但无限期运行并等待作业的 Service(例如媒体播放器)。START_REDELIVER_INTENT:如果系统在onStartCommand()返回后终止 Service ,则其会重建 Service ,并通过传递给 Service 的最后一个 Intent 来调用onStartCommand()。所有挂起的 Intent 均依次传递。此常量适用于主动执行应立即恢复的作业(例如下载文件)的 Service 。
实际上,IntentService 已于 API level 30 被废弃,官方建议用 androidx.work.WorkManager 或者 androidx.core.app.JobIntentService 取而代之。
绑定 Service
绑定可让其他组件(Activity、Service、ContentProvider)与 Service 进行交互,想要使用绑定,就需要实现 Service 中的onBind()回调,此方法会返回一个 IBinder 对象,该对象定义的接口可供组件用来与 Service 进行交互。
例如 Activity 通过调用bindService()来和 Service 进行绑定。bindService()接收 3 个参数:
- 一个指向 Service 的显式 Intent。
- 一个用于监控与 Service 的连接的 ServiceConnection 对象。
- 一个可选操作,如要创建尚未处于活动状态的 Service ,此参数通常应为
BIND_AUTO_CREATE,其他可能的值为BIND_DEBUG_UNBIND和BIND_NOT_FOREGROUND,或者0(表示无此参数)。
bindService()如果返回false则表示绑定的 Service 不存在或者无权限与其绑定(就算返回false也需要调用unbindService()来关闭空闲的 Service)。ServiceConnection 对象需要重写onServiceConnected()和onServiceDisconnected(),其中onServiceConnected()的参数列表中包含一个 IBinder 类型的参数,这个参数将用于在 Activity 和 Service 间进行通信。
在实现绑定 Service 的过程中,最重要的环节是定义onBind()回调方法所返回的 IBinder 接口,定义 IBinder 接口主要有三种方式:继承 Binder 类、使用 Messenger、使用 AIDL 。
继承 Binder 类
如果 Service 无需跨进程工作,那么可以通过继承 Binder 类并从onBind()返回该类的实例来创建接口。当 Activity 在onServiceConnected()收到 Binder 后,可利用它直接访问 Binder 实现或 Service 中提供的公共方法。
1 | |
1 | |
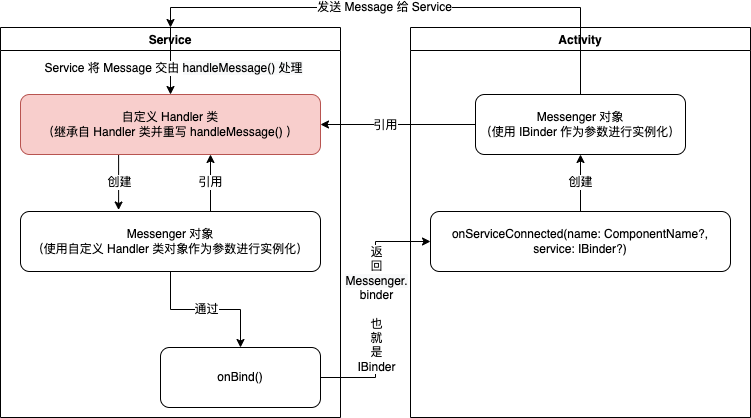
使用 Messenger
这是执行进程间通信 (IPC) 最为简单的方式(无需使用 AIDL),就是使用 Messenger 为 Service 提供接口。
Service 生命周期
startService()被调用后 Service 就会启动并回调onStartCommand(),如果这个 Service 之前还没有创建过,在执行onStartCommand()之前还要先执行onCreate(),虽然每调用一次startService()就会执行一次onStartCommand(),但实际上每个 Service 只会存在一个实例,所以不管调用了多少次startService(),只需调用一次stopService()或stopSelf(),Service 就会停止。
Service 的生命周期独立于启动它的组件,即使系统销毁了启动 Service 的组件,该 Service 仍可在后台无限期地运行。因此,Service 应在其工作完成时通过调用stopSelf()来自行停止运行,或者由另一个组件通过调用stopService()来将其停止。
调用stopService()后 Service 就会回调onDestroy()并销毁。调用unbindService()也一样。但是想要停止一个既调用了startService()又调用了bindService()的 Service ,就需要同时调用stopService()和unbindService()。
一个 Service 可以和多个 Activity 进行绑定,只不过系统会缓存 IBinder 服务通信通道,所以只在 Activity 和 Service 第一次绑定时系统才会回调onBind()来生成 IBinder 。接着系统就会将这个 IBinder 传递给其它绑定到这个 Service 的 Activity 。当 Service 与所有 Activity 之间的绑定全部取消时,系统才会销毁该 Service(除非还使用startService()启动了该 Service)。所以如果 Service 是纯粹的绑定服务,则无需对其生命周期进行管理,因为系统会自动根据它是否仍然和其它组件处于绑定状态来管理它的生命周期。
如果实现了onStartCommand()回调,就必须显式停止 Service ,因为系统已将 Service 视为已启动状态。在此情况下,Service 将一直运行,直到它通过stopSelf()自行停止或其他组件调用stopService()将其停止(与该 Service 是否绑定到任何组件无关)。
前台 Service
从 Android 8.0 开始,应用的后台功能被大幅削弱。现在只有当应用保持在前台可见状态的情况下,Service 才能保证稳定运行,一旦应用进入后台之后,Service 随时都有可能被系统回收。如果希望 Service 能够一直保持运行状态,或者正确一点说,在应用需要在后台执行一项需要引起用户注意的任务时,就可以使用前台 Service 。前台 Service 和普通 Service 的区别就在于前者在启动后,会有一个程序图标一直显示在系统状态栏(变相让应用显示在前台,提醒用户该应用在占用资源),当用户下拉状态栏后就可以看到更加详细的信息,类似于通知的效果。系统往往也不会轻易去回收前台 Service 。
运行 Android 12 API 31 以及更高版本的设备会为短时运行的前台 Service 提供 streamlined experience 。在这些设备上,系统在显示与前台 Service 相关的通知之前会等待 10 秒。但也有少数例外。如果一个前台 Service 具有以下特征之一,则它的通知会立即显示:
- 该前台 Service 的通知里包含操作按钮(用于快速响应的按钮,例如回复短信)。
- Service 在
AndroidManifest.xml中注册的时候,将android:foregroundServiceType属性设置为mediaPlayback、mediaProjection、phoneCall三者之一。 - 该 Service 提供与通话、导航或媒体播放相关的用例,如通知的分类属性中所定义的那样。
- 该 Service 在设置通知时调用
setForegroundServiceBehavior()并传入FOREGROUND_SERVICE_IMMEDIATE。
在 Android 13 API 33 之前,想要清除前台 Service 的通知,只能等待这个 Service 停止运行或者被移除前台。但是从 Android 13 API 33 开始,默认情况下,用户可以通过滑动手势清除下拉状态栏中前台 Service 的通知。如果想要通知不能被用户移除,那么就需要在使用Notification.Builder构建通知时调用setOngoing()并传入true。
以 Android 9.0 API 28 或更高版本为目标 SDK 的应用想要使用前台 Service 需要先在AndroidManifest.xml中申请FOREGROUND_SERVICE权限:
1 | |
这个权限属于普通权限,系统会自动同意的。如果不申请这个权限,系统会抛出SecurityException异常。
使用前台 Service
在将 Service 设置为前台 Service 前需要先通过~~startForegroundService()~~startService()来启动 Service ,然后调用startForeground()来让 Service 在前台运行,startForeground()通常会在 Service 的onStartCommand()中调用,这个方法接收两个参数:第一个是一个正整数,用于唯一标识状态栏中的通知。第二个就是通知对象本身。
1 | |
首先在 Service 中创建一个 NotificationManager 对象用于创建 Channel ,接着初始化一个 NotificationChannel 对象,然后利用 NotificationManager 对象创建这个 Channel 。接着创建一个 Notification 对象,把它的 Channel 设置为上面创建的 Channel 。最后再通过startForeground()让 Service 显示通知即可。另外这里为了和 Activity 进行交互,还额外编写了一些逻辑,包括自定义的 Binder 并在onBind()中返回它的实例对象。
1 | |
在 Activity 中主要是为界面上的 3 个按钮编写了点击监听,3 个按钮分别用于启动前台 Service 、停止显示并移除 Service 的通知、终止 Service 。另外还为绑定交互编写了 ServiceConnection 对象并在onServiceConnected()中获取 MyService 的引用。
程序最终的执行效果是:
- 启动后点击按钮 1 ,通知抽屉会显示通知,这个通知会立刻显示,并且在 Android 12 及以下的系统中不可被滑动移除。
- 此时点击按钮 2 ,通知会被移除,如果
stopForeground(Service.STOP_FOREGROUND_REMOVE)中的参数是STOP_FOREGROUND_DETACH的话,则通知不会立刻被移除,但是可以通过手指滑动来清除它。 - 如果不点击按钮 2 而是直接点击按钮 3 ,则 Service 会停止运行,且通知会被移除。
以 Android 12 API 31 或更高版本为目标 SDK 的应用将不再被允许从后台启动前台 Service ,系统因此会抛出ForegroundServiceStartNotAllowedException异常。当然,这也是有例外的:background-start-restriction-exemptions。
用户主动停止前台 Service
从 Android 13 API 33 开始,用户可以在下拉通知栏中通过「Foreground Services (FGS) Task Manager」也就是「前台 Service 任务管理器」来停止一个正在运行的前台 Service ,无论应用的目标 SDK 版本是多少。被停止的应用会出现以下现象:
- 系统会将应用从内存中移除,所以不仅是正在运行的前台 Service ,整个应用都会停止。
- 系统会移除应用的 Activity 返回栈。
- 任何媒体播放行为都会停止。
- 前台 Service 在通知栏对应的通知会被移除。
但是:
- 应用在历史记录中仍然得到保留。
- 计划任务得到保留。
- 闹钟得到保留。
并且,系统在停止应用的时候不会有任何回调,但是在应用重启的时候,可以通过ApplicationExitInfo API 的REASON_USER_REQUESTED来尝试找到原因。
当然,这里也有例外,有那么几种类型的应用,它们在运行前台 Service 的时候并不会出现在 FGS 任务管理器中:
- 系统级别的应用。
- 与安全相关的应用,这些应用往往持有
ROLE_EMERGENCY角色标记。 - 一些厂商的预装应用。
- 设备处于演示模式。
而以下这几种类型的应用,虽然会出现在 FGS 任务管理器中,但是界面上也不存在用于终止它们的按钮:
- 设备所有者的应用(Device owner apps)。
- 资料所有者的应用(Profile owner apps)。
- 持久性应用:在
AndroidManifest.xml的<application>标签内设置android:persistent="true"的应用。另外,一般的应用不应该进行这样的设置,持久性应用一般是系统应用。 - 应用持有
ROLE_DIALER角色标记。
声明 Service 类型
以 Android 10 API 29 或更高版本为目标 SDK 的应用如果需要在前台 Service 中访问位置信息的话,需要在AndroidManifest.xml中为 Service 声明其类型,例如:
1 | |
如果在以 Android 11 API 30 或更高版本为目标 SDK 的应用中需要访问位置信息的同时需要访问相机的话,就需要这么写:android:foregroundServiceType="location|camera"。默认情况下在调用startForeground()以后,系统会允许 Service 使用在AndroidManifest.xml中声明的这些权限,但是在运行时,也可以通过在startForeground()中增加参数来对 Service 获取的权限加以限制,例如:
1 | |
这么写的话,前台 Service 的类型就会被定性成与位置信息相关。而如果需要限制的权限有多个的话,可以这么写:
1 | |
从 Android 11 API 30 开始,为了保护用户隐私,一个位于后台的应用启动了一个前台 Service ,这个前台 Service 将受到以下限制:
- 除非用户同意授予该应用
ACCESS_BACKGROUND_LOCATION权限,否则这个前台 Service 无法访问位置信息。 - 无法访问麦克风和摄像头。
即使这个应用在AndroidManifest.xml的<service>标签内声明了 Service 类型,它也仍然会受到 Android 11 这个系统的限制。但是,仍然有例外:Exemptions from the restrictions
参考资料
- 服务概览
- 《第一行代码 Android 第3版》郭霖 著