Kotlin 学习笔记 - 基础

这篇笔记是对 Kotlin 的基础语法和一些基本特性进行记录。

数据类型

在 Java 中存在 8 个基本数据类型以及相对应的包装类。

  • int(整型) -> Integer
  • short(短整) -> Short
  • long(长整) -> Long
  • float(单精度浮点) -> Float
  • double(双精度浮点) -> Double
  • char(字符) -> Character
  • byte(字节) -> Byte
  • boolean(布尔) -> Boolean

例如int一般用于修饰变量,而Integer则是作为一个类存在的,拥有自己的成员变量和成员函数。Java 这么做是为了降低开销,提升性能,而在 Kotlin 中,则不存在基本数据类型,例如整型直接对应的就是Int这个类。

在 Kotlin 中存在诸如toByte()toFloat()toString()等类型转换函数用于更好地转换类型。

Kotlin 中的字符串也有很多实用的功能,例如:

1
2
3
4
5
6
7
8
9
10
// 利用字符串模板在字符串中直接加入变量
val name = "Aiden"
println("name is $name, and length of the name is ${name.length}.")

// 以所见即所得的形式定义一个字符串
val s = """
haha
h e he
""".trimIndent()
println(s)

输出结果为:

name is Aiden, and length of the name is 5.
haha
h e he

空安全

假设在 Java 中定义了一个Person类,然后去实例化它的对象:

1
Person person = null;

这么写是没错的,变量person就是Person类型的,只不过它的值为null而已。照着这个思路,在 Kotlin 中会很自然地写出:

1
var p: Person = null

这时候编译器会报错:null不可以被赋值给一个值不能为null的类型。也就是说,变量person确实是Person类的实例,只不过它不能被赋值为null,如果想要把它赋值为null,需要把它的类型改成Person?

1
var p: Person? = null

而当调用一个可为空类型的对象的时候,编译器会报错并提供 3 种更加安全的方案:

  • 添加空检查:使用 if 语句判断对象是否为null,在不为null的分支中执行代码。
  • 使用安全调用:例如person?.walk(),这样一来当personnull时它将不会调用walk()
  • 使用非空断言:例如person!!.walk(),此举将告知编译器person不会为空,如果为空,后果自负。

Kotlin 的这些特性使得所有对象在默认情况下都不能为null,以及在一定程度上避免了出现空指针异常的情况。

函数

函数的命名和变量一样都是小驼峰式命名法,也就是以小写字母开头。

单一表达式函数

针对只有一条 return 语句的函数,可以直接用=连接函数名,后面跟上返回的内容,这样就省去了花括号和返回类型:

1
fun sayHello(name: String) = "Hello, $name"

默认参数

Kotlin 函数中的参数支持设置默认值,这使得函数在调用时会更灵活:

1
fun sayHello(name: String = "Aiden") = "Hello, $name"

此时如果调用sayHello()不传入参数的话,那么name的值将会是Aiden

流程控制

if

Kotlin 中的 if 语句不仅可以作为 Statement 使用,还可以作为 Expression 使用。例如:

1
2
val age = 18
val isAdult = if (age >= 18) true else false // 直接对 isAdult 进行赋值

when

简而言之就是 Java 中的 switch 语句,只不过同样可以当 Expression 使用:

1
2
3
4
5
6
val score = 80
val level = when (score) {
80 -> "High"
60 -> "Medium"
else -> "Low"
}

不过与 switch 不一样的是 when 强制要求添加else分支。

while & for

Kotlin 中的 while 语句和 Java 的没什么区别,就是循环,但是 for 语句更多的起到一个遍历的用途。

1
2
3
4
5
6
7
8
9
10
11
12
// 遍历数字区间
for (i in 1..5) // 左闭右闭区间 [1, 5]
println(i)

// 倒序遍历数字区间
for (i in 5 downTo 1) // 不能使用 5..1
println(i)

// 遍历列表
val stringList = listOf("Aiden", "Marcus", "WatchDogs")
for (str in stringList)
println(str)

面向对象

普通类

假设要定义一个「人」类,拥有姓名和年龄这两个属性:

1
class Person(val name: String, var age: Int)

这一行代码中包含了很多信息:

  • 类名后面的括号实际上是主构造函数,在实例化对象的时候会把传进来的参数(上述例子中是nameage)赋值给类中的属性。
  • 括号内定义的是类的属性,同时编译器还会为这些属性生成 getter 和 setter 函数。只不过用val修饰的变量就只会有 getter 不会有 setter ,因为val修饰的属性是不可修改的,而var修饰的则两者都有。

自定义 getter setter

无论是 Java 还是 Kotlin 的属性都会有 getter 和 setter 函数,但是 Kotlin 的属性还拥有自定义 getter 和 setter 这个特性。假设现在要为上面的Person类增加一个叫做isAdult的属性,获取这个属性的时候返回一个布尔值,如果是true就代表这个对象已经成年了,可以这么做:

1
2
3
4
5
6
7
8
9
10
11
fun main() {
Person("Aiden", 23).also {
if (it.isAdult) println("成年了")
else println("未成年")
}
}

class Person(val name: String, var age: Int) {
val isAdult
get() = age >= 18
}

输出结果为:

成年了

可以看到:

  • 成年与否实际上应该算是一个人的属性而不是函数,只有像走路、吃饭这样的事情才应该写成函数,这是很符合直觉的。
  • get()直接用=连接这种写法同样是用到了之前说到的单一表达式函数特性,但是如果 getter 的逻辑一行写不完,那也可以用花括号而不是直接用等号。
  • 从语法的角度来看,确实增加了一个新的属性isAdult。但是从实现层面来看,编译器在 JVM 层面仍然将其优化成了一个函数,所以这个「属性」并不会占用内存。

var修饰的属性就会有 setter ,只不过如果希望在实例化对象的时候额外做点事情,那么就可以使用自定义 setter :

1
2
3
4
5
6
7
class Person(val name: String) {
var age: Int = 0
set(value) {
println("do something.")
field = value
}
}

可以看到:

  • age仍然是被var修饰,代表它有 setter 函数。
  • 想要为age增加自定义 setter ,需要将其从主构造函数中分离出来,并且为其初始化。
  • 例如person.age = 23这条语句,23会在自定义 setter 中作为参数被传递,也就是set(value)中的value,而函数体内的field代表的是age本身的值,这里是0,因为初始化为0

继承

Kotlin 在类继承方面仍然有很多新特性:

  • Java 继承使用extends关键字,Kotlin 使用冒号:,继承类使用冒号,实现接口也使用冒号,类和多个接口之间用逗号,分离。
  • Java 重写函数用@Override注解,Kotlin 使用override关键字修饰重写的函数。
  • Kotlin 的类默认是不能被继承的,只有被open关键字修饰的类才能被继承,同样只有被open关键字修饰的函数才能被重写。

类嵌套

1
2
3
4
5
6
7
class A {
val name = "Aiden"

class B {
// val str = name // 报错
}
}

B类嵌套在A类内部,内部类不能访问外部类的属性,这种情况对应了 Java 中的静态内部类。如果想要内部类可以持有外部类的引用,则需要给内部类加上inner关键字:

1
2
3
4
5
6
7
8
9
class A {
val name = "Aiden"
fun walk() {}

inner class B {
val str = name
val method = walk()
}
}

Kotlin 将类嵌套默认实现成静态内部类,这样在默认情况下就不会出现内存泄漏的情况。

数据类

数据类(data class)主要是用于存放数据的类,是 Java 没有的概念。

  • 数据类的主构造函数中至少要有一个参数。
  • 编译器会为数据类生成几个函数:N 个 componentN(),其中 N 代表主构造函数中参数的个数、copy()toString()hashCode()equals()

密封类

密封类(sealed class)类似于枚举,不过更强大。也是 Java 中没有的概念。

枚举中的一个值和它自己永远是的结构相等且引用相等,如果需要枚举的值拥有不一样的引用,就可以使用密封类。

接口

  • 接口中可以声明属性,只不过属性不能有初始值。被val修饰的属性可以自定义 getter ,被var修饰的属性既不能自定义 getter 也不能自定义 setter 。
  • 函数也可以有默认实现。

编译器干了什么

原始类型

前面提到,相较 Java 来说,Kotlin 在语法层面是只有包装类的,也就是例如 Java 中的 long 到了 Kotlin 后就只有 Long 。但是原始类型的存在也是有理由的,因为它的性能损耗会更低,那么 Kotlin 是怎么优化性能的?

首先在 Kotlin 写出声明 Long 类型变量的一些情况:

1
2
3
4
5
6
7
8
9
10
11
12
13
14
15
// 可变和不可变的 Long
val a = 1L
var b = 2L

// 可变和不可变的、可为空但是并不是空的 Long
val c: Long? = 3L
var d: Long? = 4L

// 可变且可为空的 Long ,先赋为 null 再赋值为 5L
var f: Long? = null
f = 5L

// 可变且可为空的 Long ,先赋为 6L 再赋值为 null
var g: Long? = 6L
g = null

将其反编译为 Java :

1
2
3
4
5
6
7
8
long a = 1L;
long b = 2L;
long c = 3L;
long d = 4L;
Long f = null;
f = 5L;
Long g = 6L;
g = null;

可以看到,尽管在 Kotlin 中只使用了 Long ,但是到了 Java 就变成既有 long 又有 Long 了,这背后的工作也是由 Kotlin 编译器完成的。一句话总结就是,有可能为null的数据,编译器会自动将其声明为包装类型。

接口语法

Kotlin 中的接口可以有属性,函数可以有默认实现,这是什么原理呢。

1
2
3
4
5
6
7
8
9
10
interface ClickListener {
val enable: Boolean
fun click() {
println("被点击了")
}
}

class MyButton : ClickListener {
override var enable: Boolean = false
}

先从接口的定义看起,有一个布尔类型的属性和一个函数,反编译至 Java :

1
2
3
4
5
6
7
8
9
10
11
12
public interface ClickListener {
boolean getEnable();

void click();

public static final class DefaultImpls {
public static void click(@NotNull ClickListener $this) {
String var1 = "被点击了";
System.out.println(var1);
}
}
}

可以看到:属性本质上是一个 get 函数,click()的默认实现被放到了一个静态内部类当中的一个同名静态函数当中。再来看MyButton类:

1
2
3
4
5
6
7
8
9
10
11
12
13
14
15
public final class MyButton implements ClickListener {
private boolean enable;

public boolean getEnable() {
return this.enable;
}

public void setEnable(boolean var1) {
this.enable = var1;
}

public void click() {
ClickListener.DefaultImpls.click(this);
}
}

MyButton类实现ClickListener接口后,重写了getEnable(),这是必须重写的,但是因为我在 Kotlin 的MyButton类中将enablevar来声明,导致编译器在 Java 里又帮我添加了一个setEnable(),同时它还声明了private boolean enable;enable没有初始化为false是因为 boolean 默认为false),这样一来,一个具备 getter 和 setter 的属性就声明完成了……也就是说,我在 Kotlin 接口中声明的属性,被反编译至 Java 后,先是在 Java 的接口定义处变成了函数,然后在接口实现处又变回了属性。而click()也经历了重写,只不过因为它有默认实现,所以这个重写就是简单的调用这个实现就行了。

更多例子

  • 类型推导,定义变量时省略的变量类型,最终会被编译器补充回来。
  • 字符串模板,编译器最终会将它们转换成 Java 中拼接的形式。
  • when 表达式,编译器最终会将它们转换成类似 switch case 的语句。
  • 类默认 public ,定义类时省略的 public 最终会被编译器补充回来。
  • 嵌套类默认 static ,嵌套类默认会被添加static关键字,将其变成静态内部类,防止不必要的内存泄漏。
  • 数据类,定义数据类只用一行代码,编译器在后期补充了很多相关函数。

object 关键字

Kotlin 中的object关键字有着三种迥然不同的语义,分别可以定义:

  • 匿名内部类
  • 单例模式
  • 伴生对象

之所以会出现这样的情况,是因为设计者认为,这三种语义本质上都是在定义一个类的同时还创建了对象。

匿名内部类

匿名内部类通常只使用一次(因为它是匿名的),并且会继承一个父类或者实现一个接口。

在 Java 中不使用匿名内部类是这样的:

1
2
3
4
5
6
7
8
9
10
11
12
13
14
15
16
17
18
public class JavaLab {
public static void main(String[] args) {
Human human = new Human();
human.walk();
}
}

abstract class Animal {
public abstract void walk();
}

// 手动继承抽象类并实现抽象函数
class Human extends Animal {
@Override
public void walk() {
System.out.println("Human walk.");
}
}

变量命名的意义可能不大,不过重点在于Human类重写了walk(),并且只用了一次,那大可使用匿名内部类的方式来实现:

1
2
3
4
5
6
7
8
9
10
11
12
13
14
15
16
public class JavaLab {
public static void main(String[] args) {
// 写法是添加花括号,括号内部就是匿名类的实现,并且该类会继承 Animal
Animal animal = new Animal() {
@Override
public void walk() {
// 匿名内部类继承 Animal 后实现抽象函数
}
};
animal.walk();
}
}

abstract class Animal {
public abstract void walk();
}

这种写法同样可以用于接口上:

1
2
3
4
5
6
7
8
9
10
11
12
13
14
15
16
17
18
19
20
21
22
23
24
public class JavaLab {
public static void main(String[] args) {
// 可以这么写
Foo foo = new Foo() {
@Override
public void Bar() {

}
};
foo.Bar();

// 也可以简化这么写
new Foo() {
@Override
public void Bar() {

}
}.Bar();
}
}

interface Foo {
void Bar();
}

甚至可以使用 Lambda 语法:

1
2
3
4
5
6
7
8
9
10
public static void main(String[] args) {
Foo foo = () -> {

};
foo.Bar();

((Foo) () -> {

}).Bar();
}

接下来看一些一般用例:

1
2
3
4
5
6
7
8
9
10
11
12
13
14
15
16
17
18
19
20
21
22
23
24
// 继承`Thread`类来开启线程
Thread thread = new Thread() {
@Override
public void run() {
super.run();
}
};
thread.start();

// 实现`Runnable`接口来开启线程
Runnable runnable = () -> {
// 编写 run() 中的逻辑
};
Thread myThread = new Thread(runnable);
myThread.start();

// 在 Android 中为按钮控件添加点击事件
Button button = new Button(); // 此处报错,需要提供上下文,不过不是重点
button.setOnClickListener(new View.OnClickListener() {
@Override
public void onClick(View view) {
// 按钮点击逻辑
}
});

Kotlin 则通过object关键字来创建匿名内部类,并且同样需要重写那些未实现的函数:

1
2
3
4
5
6
7
// 在 Android 中为按钮控件添加点击事件
val bt = Button(this)
bt.setOnClickListener(object : View.OnClickListener {
override fun onClick(p0: View?) {
TODO("Not yet implemented")
}
})

只不过跟 Java 不一样的是,Kotlin 可以同时继承一个类和实现多个接口:

1
2
3
4
5
6
7
8
9
10
11
12
13
14
15
16
17
18
19
20
21
22
23
24
25
26
27
28
fun main() {
// 实现了 Foo 和 Foo2 两个接口以及一个抽象类 Foo3
val temp = object : Foo, Foo2, Foo3() {
override fun bar() {
TODO("Not yet implemented")
}

override fun bar2() {
TODO("Not yet implemented")
}

override fun bar3() {
TODO("Not yet implemented")
}
}
}

interface Foo {
fun bar()
}

interface Foo2 {
fun bar2()
}

abstract class Foo3 {
abstract fun bar3()
}

单例模式

object

Kotlin 中最简单的定义单例类的方式就是通过object关键字:

1
2
3
4
5
6
7
8
fun main() {
Singleton.foo()
}

// 不需要 class 修饰
object Singleton {
fun foo() {}
}

接下来将 Kotlin 字节码反编译至 Java 看看 Kotlin 是如何使用object关键字实现单例类的:

1
2
3
4
5
6
7
8
9
10
11
12
13
14
15
16
17
18
19
20
21
22
23
24
25
26
27
28
public final class KotlinLabKt {
public static final void main() {
Singleton.INSTANCE.foo();
}

public static void main(String[] var0) {
main();
}
}

public final class Singleton {

// 创建一个该类的成员变量
@NotNull
public static final Singleton INSTANCE;

public final void foo() {
}

// 私有化构造函数
private Singleton() {
}

static {
Singleton var0 = new Singleton();
INSTANCE = var0;
}
}

可以看到,尽管编写过程很简单,但是编译器还是在背后把该做的都做了,包括私有化构造函数、创建一个该类的成员变量,并用static修饰。不过仍然有需要注意的地方:程序中并没有出现我们熟悉的getInstance()之类的用于获取实例的函数,也没有双重检查用于保证线程安全,并且INSTANCE变量,也就是我们用于返回的实例变量,还被final修饰了——这一切其实都是因为static{}代码块。在static{}代码块中的代码,将由虚拟机保证只会被执行一次,也就是保证了线程安全,就不需要双重检查了,同时又保证了INSTANCE变量只会被赋值一次,所以就用final修饰了。同时也可以看到,调用方式为单例类名.实例对象名.函数名

这样的单例类真的很简洁明了,看得很舒服,但是也存在两个很明显的不足:

  • 不支持懒加载(懒汉和饿汉)。
  • 不支持传参构造单例(例如无法传递上下文)。

懒加载

1
2
3
4
5
6
7
8
9
10
11
12
class Data private constructor() {
object DataManager {
private fun loadData(): Data {
// 执行网络请求
return Data()
}

val data by lazy {
loadData()
}
}
}

使用 by lazy 把属性包裹起来,只要data没有被使用过,就不会触发loadData()。这其实是一种简洁与性能的折中方案。一个对象所占用的内存资源毕竟不大,但是从服务器去请求数据所消耗的资源就会大很多,能保证这个部分是懒加载就算不错了。

Double Check

1
2
3
4
5
6
7
8
9
10
11
12
class Singleton private constructor() {
companion object {
// 使用 @Volatile 注解保证同步性
@Volatile
private var instance: Singleton? = null
// 第一次使用 elvis 操作符进行判空
fun getInstance(): Singleton = instance ?: synchronized(this) {
// 第二次判空
instance ?: Singleton().also { instance = it }
}
}
}

这个写法其实也来自 Google :architecture-components-samples/UsersDatabase.kt at master · android/architecture-components-samples · GitHub,本质上和 Java 的双重检查没什么区别。

抽象类模板

Double Check 是很好的方案,既解决了懒加载又满足了传参,可是它还不够完美,因为针对不同的类,每次都要把逻辑从头写一遍,每次都要写一遍 Double Check 就很麻烦,那么如何复用这部分操作呢。

1
2
3
4
5
6
7
8
9
10
11
12
13
14
15
16
17
18
19
20
21
22
23
24
25
26
fun main() {
// 使用
val data = Data.getInstance("")
data.foo()
}

abstract class BaseSingleton<in P, out T> {
@Volatile
private var instance: T? = null
protected abstract fun create(param: P): T
fun getInstance(param: P): T = instance ?: synchronized(this) {
instance ?: create(param).also { instance = it }
}
}

class Data private constructor() {
companion object : BaseSingleton<String, Data>() {
// 实例化对象的逻辑将放在 create() 中
override fun create(param: String): Data {
// 可以进行一些额外处理
return Data()
}
}

fun foo() {}
}

利用泛型并通过继承一个抽象类并实现其抽象函数,可以把重复的工作放在抽象类当中,然后把如何实例化的逻辑抽取出来,针对不同的类编写不一样的逻辑。例如上面的例子中,Data类中的伴生对象(伴生对象也是一个类)在继承BaseSingleton<in P, out T>以后就只需要重写create(),保证其最终返回一个Data对象就行了。至于 Volatile 和双重检查的逻辑,已经在抽象类中实现了。

伴生对象

Kotlin 中没有static关键字,想要定义静态变量和静态函数,需要使用到伴生对象也就是companion object

1
2
3
4
5
6
7
8
9
10
11
12
13
fun main() {
Foo.name = "Aiden"
Foo.bar()
}

class Foo {
companion object {
var name = ""
fun bar() {
println("my name is $name")
}
}
}

这样就很有静态的感觉。那么object{}companion object{}都可以在类的内部声明,那它们之间有什么区别呢。

1
2
3
4
5
6
7
8
9
10
11
12
13
14
15
16
17
18
19
20
21
22
fun main() {
ObjectTest.InnerSingleton.foo()
ObjectTest.InnerSingleton.name = "Aiden"
println(ObjectTest.InnerSingleton.name)

CompanionObjectTest.bar()
println(CompanionObjectTest.name)
}

class ObjectTest {
object InnerSingleton {
var name = ""
fun foo() {}
}
}

class CompanionObjectTest {
companion object {
const val name = "Aiden"
fun bar() {}
}
}

反编译至 Java :

1
2
3
4
5
6
7
8
9
10
public final class KotlinLabKt {
public static final void main() {
ObjectTest.InnerSingleton.INSTANCE.foo();
CompanionObjectTest.Companion.bar();
}

public static void main(String[] var0) {
main();
}
}

可以看到,object{}由于被嵌入到一个类中,所以在调用的时候会比companion object{}多一层,如果想要去掉这一层(.INSTANCE),可以在fun foo() {}上边加上@JvmStatic注解,再次反编译就会发现少了这一层,不过感觉也没什么卵用。

1
2
3
4
5
6
7
8
9
10
11
12
13
14
15
16
17
18
19
20
21
22
23
24
25
26
27
28
29
public final class ObjectTest {
public static final class InnerSingleton {
@NotNull
public static final String name = "Aiden";
private static int age;
@NotNull
public static final InnerSingleton INSTANCE;

public final int getAge() {
return age;
}

public final void setAge(int var1) {
age = var1;
}

public final void foo() {
}

private InnerSingleton() {
}

static {
InnerSingleton var0 = new InnerSingleton();
INSTANCE = var0;
age = 23;
}
}
}

可以看到,object{}就是把单例类嵌入到类中(在static{}代码块中执行一些变量初始化操作),然后通过实例对象来调用变量和 getter 和 setter 以及其它函数。只不过相比直接使用object定义单例类,嵌入到类中的单例类还会被static修饰。

1
2
3
4
5
6
7
8
9
10
11
12
13
14
15
16
17
18
19
20
21
22
23
24
25
26
27
public final class CompanionObjectTest {
@NotNull
public static final String name = "Aiden";
private static int age = 23;
@NotNull
public static final Companion Companion = new Companion((DefaultConstructorMarker)null);

public static final class Companion {
public final int getAge() {
return CompanionObjectTest.age;
}

public final void setAge(int var1) {
CompanionObjectTest.age = var1;
}

public final void bar() {
}

private Companion() {
}

public Companion(DefaultConstructorMarker $constructor_marker) {
this();
}
}
}

companion object{}就有点不一样了,它首先把所有的变量放在类的最外层并且用static修饰,然后新建了一个叫Companion的静态内部类,其中包含了所有的函数(包括最外层的那些变量的 getter 和 setter)。

总结

看了object{}companion object{}反编译代码的对比,感觉也没什么特别的,不如来总结一下单例类的用法:

  • 如果单例占用内存很小,并且对内存不敏感,不需要传参,直接使用object定义即可。
  • 如果单例占用内存很小,不需要传参,但它内部的属性会触发消耗资源的网络请求和数据库查询,则可以使用object搭配懒加载。
  • 如果工程很简单,只有一两个单例场景,同时有懒加载需求,并且需要传参,则可以直接手写 Double Check 。
  • 如果工程规模大,对内存敏感,单例场景比较多,那就很有必要使用抽象类模板了。

扩展

扩展函数

扩展函数是个函数,函数可以被类实例对象调用,所以扩展很明显指的就是扩展这个类了。但是函数明明可以直接写在类里,想要什么功能就写什么函数,为什么还要扩展?所以很明显,扩展的往往是那些不能被修改的类。来看个例子:

1
2
3
4
5
6
7
8
9
10
fun main() {
println("1000秒是多少分多少秒呢?是${1000.toMinSec()}")
}


fun Int.toMinSec(): String {
val min = this / 60 // this 代表调用这个函数的 Int 对象
val sec = this % 60
return "$min:$sec"
}

toMinSec()的具体逻辑是什么并不重要。重点在于Int类是 Kotlin 官方的类,是不能被修改的,但是toMinSec()作为扩展函数,它扩展了Int类,这样一来,Int类对象就可以直接调用这个函数。扩展函数的好处就在于方便且符合直觉:这个功能就是和这个类相关的,那么这个类的对象就应该可以直接调用函数。

编写扩展函数的关键在于函数的声明处,在上面的例子中,Int.toMinSec()代表的是将名为toMinSec()的函数作为Int类的扩展函数,在后续的使用中,如上面的1000,作为Int对象,就可以直接调用这个函数。还有一点就是函数当中的this关键字,这个关键字在函数内代表的是调用这个函数的对象,在上面的例子中就是1000

接下来利用反编译看一下扩展函数神奇在哪里(为了简化,这里就把函数内的逻辑改成一行打印):

1
2
3
4
5
6
7
public static final void main() {
toMinSec(100);
}

public static final void toMinSec(int $this$toMinSec) {
System.out.println($this$toMinSec);
}

不难看出,Kotlin 编写的扩展函数,最终会变成静态函数的调用,并没有修改任何类的源码。

扩展属性

扩展属性也是类似:

1
2
3
4
5
6
fun main() {
println("Aiden".foo)
}

val String.foo
get() = "bar"

可以看到,区别只是将fun改成val/var而已,然后把函数体改成 get 函数,函数内同样可以通过this关键字引用这个 String 对象。针对这个例子反编译至 Java 会发现扩展属性的实现同样是一个静态函数,函数名为getFoo

局限性

扩展并非无所不能,因为其本质终究是一个静态函数,这就导致了至少 3 个限制:

  • 无法被重写。这很好理解,假设为 A 类编写了一个扩展函数(这个扩展函数位于顶层),这个 A 类是用open修饰的,然后 B 类继承了 A 类,但是就算这样还是无法重写这个扩展函数,因为这个扩展函数根本就不是 A 类的成员。如果非要重写,那可以把这个扩展函数写在 A 类的里面,但是这样又没意义了,如果可以修改类的代码,那还要扩展函数做什么。
  • 扩展属性无法存储状态。对于扩展属性,可以编写 get 函数,但是编写 set 函数的时候并不能调用field进行赋值。
  • 访问的作用域仅限于两处。一是扩展声明所在的作用域的变量(例如在顶层),扩展可以访问,哪怕这个变量是私有的。二是被扩展类的公开成员,例如扩展了 String 类,那么就可以调用 String 类的length属性,至于 String 类的私有成员,扩展则无法访问。

高阶函数

高阶函数就是将函数用作参数或返回值的函数。在 Android 开发中,为控件添加点击监听是一个很好的例子,如果用 Java 为一个按钮添加点击监听,一般这么写:

1
2
3
4
5
6
7
Button button = new Button();  // 报错,缺少上下文,不重要
button.setOnClickListener(new View.OnClickListener() {
@Override
public void onClick(View view) {
// 点击事件
}
});

同样的功能,用 Kotlin 来写,写法会简单很多,同时可读性也增加了:

1
2
3
Button(this).setOnClickListener {
// 点击事件
}

函数类型

函数类型是高阶函数中一个比较重要的概念,变量有类型,函数也能有类型吗?

1
fun foo(bar: Int): String = "6"

以上边的foo()为例,它的函数类型就是(Int) -> String,意思是这个函数接收一个整型的参数然后返回一个字符串类型的值。其它的类型比方说还有() -> UnitInt.() -> Unit等等。可以看到,函数类型由以下信息组成:

  • 函数接收的参数的数量和类型。
  • 函数是否是扩展函数(或者说是否带有接收者)。
  • 函数的返回值类型。

此外还可以通过函数引用的函数来确认函数类型,例如:

1
val method: (Int) -> String = ::foo  // 双冒号表示函数引用

编译器没有报错,说明我们通过了编译器的检查,肯定了foo()的类型就是(Int) -> String

Lambda

Lambda 可以理解为函数的简写,在上方的setOnClickListener的写法之前,其实还存在 8 种过渡写法,可以了解一下:

第一步

最原始的状态,本质是用object关键字定义了一个匿名内部类去实现OnClickListener这个接口:

1
2
3
4
5
button.setOnClickListener(object : View.OnClickListener {
override fun onClick(p0: View?) {
// 点击逻辑
}
})

第二步

object关键字可以省略,重写的函数也可以省略函数体,直接把逻辑写在花括号里:

1
2
3
button.setOnClickListener(View.OnClickListener { view: View? ->
// 点击逻辑
})

第三步

View.OnClickListener可以省略不写:

1
2
3
button.setOnClickListener({ view: View? ->
// 点击逻辑
})

第四步

编译器可以推导类型,所以View?可以省略不写:

1
2
3
button.setOnClickListener({ view ->
// 点击逻辑
})

第五步

当表达式中只存在一个参数的时候,这个参数可以用it来代表:

1
2
3
button.setOnClickListener({ it ->
// 点击逻辑
})

第六步

it可以省略不写:

1
2
3
button.setOnClickListener({
// 点击逻辑
})

第七步

当 Lambda 作为函数的最后一个参数时,花括号可以被挪到括号外面:

1
2
3
button.setOnClickListener() {
// 点击逻辑
}

第八步

当只有一个 Lambda 作为函数参数时,括号都可以省略不写:

1
2
3
button.setOnClickListener {
// 点击逻辑
}

SAM

要想使用 Lambda 表达式,一般需要满足 SAM 。SAM 是 Single Abstract Method 的缩写,意思就是只有一个抽象函数的类或者接口。只要是符合 SAM 要求的接口,编译器就能进行 SAM 转换,在编写过程中就可以直接使用 Lambda 表达式。

但是从 Java 8 开始,SAM 就有了明确的名称,叫做函数式接口(Functional interface),并且想要实现函数式接口,就要满足两个条件,缺一不可:

  • 只能是接口,抽象类不行了。
  • 接口只有一个抽象函数(接口中的函数默认是抽象的),默认实现的函数可以有多个。

并且从 Kotlin 1.4 开始,想要在 Kotlin 中实现函数式接口,必须要用fun interface来声明,普通的接口已经不行了,抽象类也不行。

了解规则后,接下来用代码解释:

1
2
3
4
5
6
7
8
9
10
11
12
13
14
15
16
17
18
19
public class JavaLab {
static void Test(IFoo foo) {

}
}

interface IFoo {
// 单抽象函数
void bar();

// 多个默认实现
default void bar2() {

}
// 多个默认实现
default void bar3() {

}
}
1
2
3
4
5
6
7
8
9
10
11
12
13
14
15
16
17
18
19
20
21
22
23
24
25
26
27
28
29
30
31
32
33
34
35
36
37
38
39
40
41
42
43
44
45
46
47
48
49
50
51
fun main() {
test {

}

test2(object : Foo2 {
override fun bar2() {
TODO("Not yet implemented")
}
})

JavaLab.Test {

}

test3("Aiden") {
print("My name is ")
}
}

// 函数式接口(Functional interface)
fun interface Foo {
// 单抽象函数
fun bar()

// 默认实现
fun rab() {

}
}

// 普通函数,接收一个实现了 Foo 接口的对象
fun test(foo: Foo) {

}

// 普通接口
interface Foo2 {
fun bar2()
}

// 普通函数,接收一个实现了 Foo2 接口的对象
fun test2(foo2: Foo2) {

}

// 高阶函数,接收了一个函数类型的参数
fun test3(name: String, hello: () -> Unit) {
hello.invoke()
print(name)
}

一个一个说明:

  • Java 中的静态函数Test()在 Kotlin 中被直接引用,函数接收一个实现了IFoo接口的对象。IFoo接口尽管有多个默认实现函数(被default修饰),但只有一个抽象函数,并且因为IFoo是接口,所以是满足 SAM 的,所以在 Kotlin 中调用Test()时可以直接使用 Lambda 表达式。
  • Kotlin 中的Foo接口被fun interface修饰,所以Foo接口已经被定性为函数式接口,在该接口中可以有多个默认实现的函数,但是如果没有抽象函数或者有多个抽象函数,编译器将会报错。因为test()接收一个实现了Foo接口的对象,所以在调用test()时可以直接使用 Lambda 表达式。
  • Foo2接口是普通的接口,并不满足 SAM ,所以test2()就算接收了它也不能使用 Lambda 表达式。
  • 抽象类也不满足 SAM ,也不能使用 Lambda 表达式,在代码里就不演示了。
  • 使用 Lambda 表达式不一定要满足 SAM ,test3()是高阶函数,并且把函数类型的参数放在了参数列表最后面,所以在调用test3()的时候也可以使用 Lambda 表达式。

函数式编程

函数式编程(Functional Programming),是一个跟「面向对象」类似的概念,它也是软件工程中的一种编程范式,它是声明式编程(Declarative Programming)的一种,而与它相反的叫做命令式编程(Imperative Programming)。这些概念之间的关系大概是这样:

编程范式

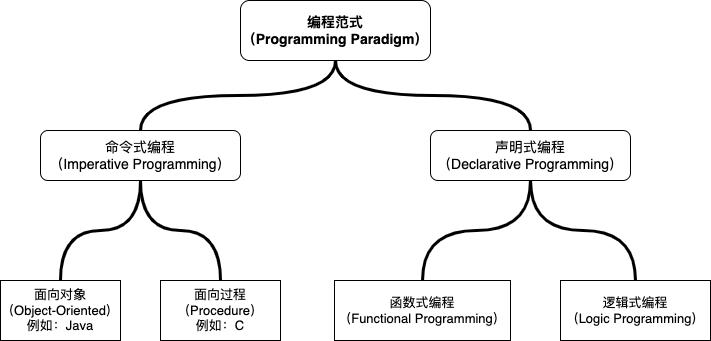
像 C 和 Java ,它们分别属于面向过程、面向对象的语言,同时又都属于命令式的范畴。使用命令式语言进行编程,一般就是根据思路,告诉计算机每一步该做什么,比如现在要从一个集合中找出所有的偶数:

1
2
3
4
5
6
7
8
fun findEvenNumber(list: List<Int> = listOf(1, 2, 3, 4)): List<Int> {
val evenList = mutableListOf<Int>() // 新建一个集合用来存放结果
for (i in list) { // 遍历数组
if (i % 2 == 0) // 判断是否能被 2 整除
evenList.add(i) // 如果能就把这个数加入到结果中
}
return evenList // 返回这个集合
}

但是如果是声明式代码就需要这么写:

1
2
// `filter()`是 Kotlin 集合类中的一个高阶函数,作用是将集合中符合 Lambda 表达式中要求的元素返回
fun findEvenNumber(list: List<Int> = listOf(1, 2, 3, 4)) = list.filter { it % 2 == 0 }

通过对比还是会感觉到风格上有不一样,那么到底如何理解 Kotlin 中的函数式编程,简单来说,有这么两点:

  • 函数在 Kotlin 中至关重要。
    • 函数可以独立于类之外,成为顶层函数;
    • 函数可以作为参数和返回值,也就是高阶函数和 Lambda ;
    • 函数可以像变量一样被引用;
  • 纯函数。
    • 函数不应该有副作用(不应该对函数作用域以外的数据进行修改)。
    • 具有幂等性(调用一次和调用 N 次,效果是等价的)。
    • 具有引用透明的特性。
    • 它具有无状态的特性。

委托

Kotlin 的委托和扩展差不多,都有两个应用场景,一个是委托类,另一个是委托属性,前者委托的是接口函数,后者委托的是属性的 getter 和 settter

委托类

1
2
3
4
5
6
7
8
9
10
11
12
13
14
15
16
17
18
19
20
21
22
23
24
25
26
fun main() {
UniversalAction(Dog()).move()
UniversalAction(Person()).move()
}

// 定义一个关于动作的接口
interface Action {
fun move()
}

// 定义了一个狗类并实现了 Action 接口重写了 move()
class Dog : Action {
override fun move() {
println("狗是爬的")
}
}

// 定义了一个人类并实现了 Action 接口重写了 move()
class Person : Action {
override fun move() {
println("人是走的")
}
}

// 通过 by 关键字进行委托
class UniversalAction(action: Action) : Action by action

输出结果是:

狗是爬的
人是走的

重点在于UniversalAction这个类,该类也实现了Action接口,只不过并没有重写move(),而是通过by关键字把move()的实现委托给了构造函数的参数,到时候直接用参数的move()就行了。这样一来UniversalAction就相当于一个壳,它并不关心move()具体怎么实现,只要传入不同的参数,就会有不同的行为

委托属性

直接委托

从 Kotlin 1.4 开始可以直接在语法层面将一个属性委托给另一个属性:

1
2
3
4
5
6
7
8
9
10
11
12
13
14
fun main() {
Foo().run {
println("count = $count | total = $total")
count = 1
println("count = $count | total = $total")
total = 2
println("count = $count | total = $total")
}
}

class Foo {
var count = 0
var total by ::count
}

这种情况下counttotal是完全一致的,因为total的 getter 和 setter 都委托给了count。其中count前面的两个冒号代表属性的引用。

懒加载委托

懒加载的应用非常广泛,对于一些需要消耗较多资源的操作,如果希望它只有在被访问的时候才去执行(从而避免不必要的资源开销),就可以使用懒加载。

1
2
3
4
5
6
7
8
9
10
11
12
13
fun main() {
println(result)
println(result)
}

val result: String by lazy {
request()
}

fun request(): String {
println("这里执行一些耗时的请求操作")
return "请求结果"
}

上面模拟了一个网络请求,result通过by lazy进行委托,也就是只有在调用到result的时候才会去执行 Lambda 中的代码。主函数中第一次调用result触发了懒加载,执行了request(),返回了一个字符串,而当第二次调用result的时候,因为已经知道了result的值,所以就直接返回了字符串,而没有再去执行request()中的内容。

另外,lazy()是一个高阶函数,函数接收两个参数,一个是LazyThreadSafetyMode枚举,一个是函数类型的参数。如果不传这个枚举参数的话,实际上调用的是单参数版本的lazy(),而单参数的lazy()默认就是调用SynchronizedLazyImpl()这个线程同步的实现。

观察者委托

// TODO

映射委托

// TODO

自定义委托

自定义委托需要遵循一个格式,例如:

1
2
3
4
5
6
7
8
9
10
11
12
13
class CustomDelegate(private var string: String) {
operator fun getValue(thisRef: Owner, property: KProperty<*>): String {
return string
}

operator fun setValue(thisRef: Owner, property: KProperty<*>, value: String) {
string = value
}
}

class Owner {
var text: String by CustomDelegate("Foobar")
}

有 3 点需要注意:

  • 对于var修饰的属性来说,需要有getValue()setValue(),同时这两个函数需要被operator关键字修饰。
  • 变量text位于Owner类中,所以getValue()setValue()中的第一个参数需要是Owner类或者是它的父类。
  • 变量text是 String 类型,所以getValue()的返回值类型和setValue()的第三个参数都应该要是 String 类型或者是它的父类。

如果觉得手动编写过于繁琐,还可以通过实现 Kotlin 官方提供的接口的形式来快速自定义委托,对于val声明的属性,就需要继承ReadOnlyProperty接口:

1
2
3
4
5
6
7
8
9
10
11
12
13
14
15
16
17
18
/**
* Base interface that can be used for implementing property delegates of read-only properties.
*
* This is provided only for convenience; you don't have to extend this interface
* as long as your property delegate has methods with the same signatures.
*
* @param T the type of object which owns the delegated property.
* @param V the type of the property value.
*/
public fun interface ReadOnlyProperty<in T, out V> {
/**
* Returns the value of the property for the given object.
* @param thisRef the object for which the value is requested.
* @param property the metadata for the property.
* @return the property value.
*/
public operator fun getValue(thisRef: T, property: KProperty<*>): V
}

注意一下,ReadOnlyProperty()使用fun interface进行声明,说明在 Kotlin 中,它就是一个符合 SAM 规则的函数式接口,事实上它也的确只有一个函数。

言归正传,对于var声明的属性来说,就需要继承ReadWriteProperty接口:

1
2
3
4
5
6
7
8
9
10
11
12
13
14
15
16
17
18
19
20
21
22
23
24
25
26
/**
* Base interface that can be used for implementing property delegates of read-write properties.
*
* This is provided only for convenience; you don't have to extend this interface
* as long as your property delegate has methods with the same signatures.
*
* @param T the type of object which owns the delegated property.
* @param V the type of the property value.
*/
public interface ReadWriteProperty<in T, V> : ReadOnlyProperty<T, V> {
/**
* Returns the value of the property for the given object.
* @param thisRef the object for which the value is requested.
* @param property the metadata for the property.
* @return the property value.
*/
public override operator fun getValue(thisRef: T, property: KProperty<*>): V

/**
* Sets the value of the property for the given object.
* @param thisRef the object for which the value is requested.
* @param property the metadata for the property.
* @param value the value to set.
*/
public operator fun setValue(thisRef: T, property: KProperty<*>, value: V)
}

例如:

1
2
3
4
5
6
7
8
9
10
11
12
13
14
15
16
17
18
19
20
21
fun main() {
Owner().run {
println(text)
text = "666"
println(text)
}
}

class Owner {
var text: String by CustomDelegate("Foobar")
}

class CustomDelegate(private var string: String) : ReadWriteProperty<Owner, String> {
override fun getValue(thisRef: Owner, property: KProperty<*>): String {
return string
}

override fun setValue(thisRef: Owner, property: KProperty<*>, value: String) {
string = value
}
}

输出结果是:

Foobar
666

另外,如果想在属性委托之前再做一些额外的判断工作,还可以使用 provideDelegate 来实现。

1
2
3
4
5
6
7
8
9
10
11
12
13
14
15
16
17
18
19
20
21
22
23
24
25
26
27
28
29
30
31
fun main() {
Owner().run {
println(textA)
println(textB)
}
}

class Owner {
var textA by SmartDelegator()
var textB by SmartDelegator()
}

class CustomDelegate(private var string: String) : ReadWriteProperty<Owner, String> {
override fun getValue(thisRef: Owner, property: KProperty<*>): String {
return string
}

override fun setValue(thisRef: Owner, property: KProperty<*>, value: String) {
string = value
}
}

class SmartDelegator {
operator fun provideDelegate(
thisRef: Owner,
property: KProperty<*>
): ReadWriteProperty<Owner, String> {
return if (property.name.contains("A")) CustomDelegate("part A")
else CustomDelegate("part B")
}
}

例如上面这个例子,把Owner的两个属性委托给了SmartDelegator类,而这个类中有一个provideDelegate(),该函数被operator关键字修饰,然后可以对委托进来的属性进行一些判断,最后返回不一样的实现了ReadWriteProperty接口的对象。

案例 - 属性封装

在类中,对于那些希望只被访问但是不能被修改的属性,可以用val来修饰。但这也仅限于一般数据类型,对于集合来说,只要拿到了实例,就可以调用修改集合的函数。针对这种情况,可以使用委托将一个不可变集合委托给一个可变集合:

1
2
3
4
5
6
7
8
9
10
11
12
13
14
15
16
17
18
19
fun main() {
Foo().run {
println(bar.size) // 正常访问
//bar.add() // 无法使用,因为是不可变的集合
//bar = listOf() // 属性被 val 修饰,不可修改
addInt(1)
addInt(2)
for (i in bar) println(i)
}
}

class Foo {
val bar: List<Int> by ::_bar // 不可变集合,用于给外界访问
private val _bar = mutableListOf<Int>() // 可变集合

fun addInt(element: Int) {
_bar.add(element)
}
}

这样一来,当需要访问集合时就调用bar,但是却不能直接调用集合的add()等函数。

案例 - 数据绑定

如果需要将控件上的某个属性与代码中的某个变量进行绑定,可以使用 DataBinding ,但是除了 DataBinding 以外,也可以使用自定义委托来实现,这种方式不一定完美,但也算是个有趣的思路。

这里以修改 TextView 上的文本为例,这是 XML 部分:

1
2
3
4
5
<TextView
android:id="@+id/textView"
android:text="Foobar"
android:layout_width="wrap_content"
android:layout_height="wrap_content" />

然后在 MainActivity 中定义一个顶层函数,同时也是 TextView 的扩展函数:

1
2
3
4
5
6
7
8
operator fun TextView.provideDelegate(value: Any?, property: KProperty<*>) =
object : ReadWriteProperty<Any?, String?> {
override fun getValue(thisRef: Any?, property: KProperty<*>): String = text.toString()

override fun setValue(thisRef: Any?, property: KProperty<*>, value: String?) {
text = value
}
}

接着是使用部分:

1
2
3
4
5
6
val tv = findViewById<TextView>(R.id.textView)
var text: String? by tv

Log.d("@@@", text.toString())
text = "666"
Log.d("@@@", tv.text.toString())

将变量text的 getter 和 setter 托管给了 TextView ,在TextView.provideDelegate()中将其与 TextView 的text属性相关联。最终程序运行会先打印 TextView 在 XML 中定义的文本,修改了text变量后,再打印就会得到修改后的结果。

案例 - ViewModel 委托

ViewModel 在 Android 中经常用来存储界面数据,但是 ViewModel 的实例并不会被直接创建,而是使用委托的方式来获得。

1
2
// 假设自定义的 ViewModel 类叫 MainViewModel
val viewModel: MainViewModel by viewModels()

稍微看一下viewModels()

1
2
3
4
5
6
7
8
9
10
11
12
13
14
15
public inline fun <reified VM : ViewModel> ComponentActivity.viewModels(
noinline extrasProducer: (() -> CreationExtras)? = null,
noinline factoryProducer: (() -> Factory)? = null
): Lazy<VM> {
val factoryPromise = factoryProducer ?: {
defaultViewModelProviderFactory
}

return ViewModelLazy(
VM::class,
{ viewModelStore },
factoryPromise,
{ extrasProducer?.invoke() ?: this.defaultViewModelCreationExtras }
)
}

点进Lazy接口中:

1
2
3
4
5
6
7
8
9
10
11
12
13
14
15
16
17
18
/**
* Represents a value with lazy initialization.
*
* To create an instance of [Lazy] use the [lazy] function.
*/
public interface Lazy<out T> {
/**
* Gets the lazily initialized value of the current Lazy instance.
* Once the value was initialized it must not change during the rest of lifetime of this Lazy instance.
*/
public val value: T

/**
* Returns `true` if a value for this Lazy instance has been already initialized, and `false` otherwise.
* Once this function has returned `true` it stays `true` for the rest of lifetime of this Lazy instance.
*/
public fun isInitialized(): Boolean
}

可以看到:

  • viewModels()ComponentActivity的扩展函数,所以可以直接在 Activity 中调用viewModels()
  • viewModels()返回Lazy接口,而ViewModelLazyLazy接口的一个实现类。
  • Lazy接口中的value属性是用val修饰的,但是接口内并没有定义getValue(),之所以能实现委托,是因为它把getValue()作为扩展函数来定义了。

泛型

在编程时会经常强调“代码复用”,而泛型的存在也算是提供了一种复用的方案。

如何使用

假设要编写遥控器类,例如:

1
2
3
4
5
6
7
8
9
10
11
12
13
14
15
16
17
// 小米电视
class MiTVController {
fun on() {}
fun off() {}
}

// 索尼电视
class SonyTVController {
fun on() {}
fun off() {}
}

// TCL 电视
class TclTVController {
fun on() {}
fun off() {}
}

但是针对每一个电视机品牌都需要编写开机和关机的函数实在是过于麻烦,而借助泛型,就可以实现“万能遥控”:

1
2
3
4
5
6
7
8
9
10
11
12
13
14
15
16
fun main() {
// 尖括号中的 MiTVController 为泛型实参
TvController<MiTV>().on(MiTV())
}

// T 为泛型形参
class TvController<T> {
fun on(tv: T) {}
fun off(tv: T) {}
}

class MiTV

class SonyTV

class TclTV

泛型的形参T代表了可以传入任意类型,借助这个特性,无论是什么品牌的电视,都可以用这个遥控器来实现开关机。

泛型的形参也可以进行范围限制,例如:

1
2
3
4
5
6
7
8
9
10
11
12
13
14
15
16
17
fun main() {
TvController<MiTV>().on(MiTV())
}

// 在形参中添加上界
class TvController<T : TV> {
fun on(tv: T) {}
fun off(tv: T) {}
}

open class TV

class MiTV : TV()

class SonyTV : TV()

class TclTV : TV()

以上代码修改了TvController的形参,这样一来,TvController就只能接收TV类的子类,这叫做泛型的上界。

除了类能使用泛型,Kotlin 中的函数也能使用泛型:

1
2
3
4
5
6
7
8
9
10
11
fun main() {
turnOnTV(MiTV())
}

open class TV

class MiTV : TV()

fun <T : TV> turnOnTV(tv: T) {
println("打开电视")
}

泛型不变性

假设一个类是另一个类的子类,那么这个类的集合和它父类的集合之间是什么关系呢:

1
2
3
4
5
6
7
8
9
10
11
12
13
14
15
16
17
fun main() {
foo(mutableListOf(Animal())) // 报错,传入类型错误
bar(mutableListOf(Cat()))
}

open class Animal
class Cat : Animal()
class Dog : Animal()

fun foo(list: MutableList<Cat>) {

}

fun bar(list: MutableList<Animal>) {
list.add(Dog())
val firstAnimal: Dog = list.first() // 报错,父类无法转成子类
}

结论是没什么关系,它们之间也无法替代对方,这就是泛型的不变性。泛型的不变性保证了程序上不会出现一些逻辑性错误。

协变(Covariant)

众所周知,在代码中,是可以往需要父类对象的地方传入子类对象的:

1
2
3
4
5
6
7
8
9
10
11
12
13
fun main() {
test(Son()) // 需要传入 Father 类,但是却传入了 Son 类,也没问题
}

// 父类
open class Father

// 子类
class Son : Father()

fun test(father: Father) {

}

那么在需要父类泛型的地方可以传入子类泛型吗?根据前面提到的泛型的不变性,两者间并不存在什么关系,所以这样做,编译器会报错:

1
2
3
4
5
6
7
8
9
10
11
12
13
14
15
16
17
18
19
20
21
fun main() {
test(Foo<Son>()) // 报错,需要传父类泛型,但是却传了子类泛型
}

// 父类
open class Father

// 子类
class Son : Father()

// 泛型类
class Foo<T> {
fun bar() {

}
}

// 使用泛型类的函数
fun test(foo: Foo<Father>) {

}

可是在某些特殊场景下确实是要这么做,那应该怎么让编译器通过编译呢,这时候就可以使用到泛型的 协变 ,协变可以在使用处或者是声明处使用:

1
2
3
4
// 使用处协变
fun test(foo: Foo<out Father>) {

}

或者:

1
2
3
4
5
6
// 声明处协变
class Foo<out T> {
fun bar() {

}
}

这样一来,就可以在需要父类泛型的地方传入子类泛型了。Kotlin 中使用out来表示协变,对应 Java 中的extends

逆变(Contravariant)

协变会让父类的泛型与子类的泛型之间产生类似于父类本身与子类本身之间的关系(也就是需要父类的地方可以传入子类),而逆变就是让这个关系反过来:

1
2
3
4
5
6
7
8
9
10
fun main() {
test(Foo<Father>()) // 报错,需要传子类泛型,但是却传了父类泛型
}

// 省略中间这部分代码

// 使用泛型类的函数
fun test(foo: Foo<Son>) {

}

同样是在使用处或者是声明处,添加in关键字就可以解决编译问题:

1
2
3
4
// 使用处协变
fun test(foo: Foo<in Son>) {

}
1
2
3
4
5
6
// 声明处协变
class Foo<in T> {
fun bar() {

}
}

Kotlin 中使用in来表示逆变,对应 Java 中的super

那么该如何记忆协变对应out,逆变对应in呢,我觉得可以这样理解:in 的意思是在什么的里面,子类往往是父类的扩展(父类有的子类都有,子类有的父类不一定有),所以如果画图来表示的话,父类是被“包含”在子类里面的,所以当遇到<in T>时,我们就可以知道,这个地方可以传入 T 的父类。因为“T 的父类 in T”。

星投影(Star-Projections)

Kotlin 可以使用星号*来作为泛型的实参:

1
2
3
4
5
6
7
8
9
10
fun main() {
bar(Foo<Int>()) // 可以传入整型
}

class Foo<T>

// 使用星投影
fun bar(foo: Foo<*>) {

}

Foo类在声明形参时使用了T,代表了这是个泛型,并不关心传入什么类型进来。然而bar()在使用泛型的时候在实参中使用了*,也是代表它并不关心传入什么类型,把最终的决定权放在了调用bar()的地方,所以在main()中就直接传入了整型。也就是说,星投影是在我们不关心实参到底是什么的时候就可以使用。

要想稍加限制也可以,只要在形参处进行限制就行了:

1
2
3
4
5
6
7
8
9
10
11
12
13
14
15
fun main() {
// bar(Foo<String>()) // 报错
bar(Foo<MyActivity>())
}

open class Foo<T : Activity> // 传进来的参数需要是 Activity 类或者是它的子类

class MyActivity : Activity() {

}

// 使用星投影
fun bar(foo: Foo<*>) {

}

这样一来,虽然bar()选择摆烂,但是真正在调用bar()传参数的时候,还是会收到Foo类的约束。

in 还是 out ?

前面稍微提到了如何记忆和使用 in 与 out ,不过实际上也没有那么复杂,无论是 Java 还是 Kotlin 的泛型,都提到了另外两个词:生产者和消费者。前者对应 out ,而后者对应 in 。

用通俗的话来说,被 in 修饰的泛型,往往会以函数的参数的形式,被传入函数里面,这是一种写入行为。而被 out 修饰的泛型,往往会以返回值的形式,被函数返回,这是一种读取行为。总的来说,传入用 in ,传出用 out ,泛型作为参数的时候用 in ,泛型作为返回值的时候用 out 。接下来看一下 Kotlin 官方的用例吧:

1
2
3
public interface Comparable<in T> {
public operator fun compareTo(other: T): Int
}
1
2
3
4
5
public interface Iterator<out T> {
public operator fun next(): T

public operator fun hasNext(): Boolean
}

注解与反射

泛型提高了代码的复用性,注解与反射则是提高了代码的灵活性。

注解

注解可以理解为对程序代码的一种补充,最常见的注解,例如 Java 中的@Override代表重写,以及@Deprecated代表了函数被弃用,以及 Jetpack Compose 中的@Composable代表了定义一个可组合项。

那么什么是“元注解”呢,在@Deprecated中可以看到,在Deprecated类的上面还有@Target@MustBeDocumented,像这种本身既是注解,又可以修饰其它注解的就是元注解。

Kotlin 常见的元注解有四个:

  • @Target:指定了被修饰的注解可以用在什么地方,也就是目标。
  • @Retention:指定了被修饰的注解是否编译后可见、是否运行时可见,也就是注解的保留位置,是保留在编译时还是运行时。
  • @Repeatable:允许在同一个地方多次使用相同的被修饰的注解,使用场景比较少。
  • @MustBeDocumented:指定被修饰的注解应该在生成的 API 文档中显示,这个注解一般用于 SDK 当中。

其中@Target有很多可取值,代表了它可以用来修饰什么:

1
2
3
4
5
6
7
8
9
10
11
12
13
14
15
16
17
18
19
20
21
22
23
24
25
26
27
28
29
30
31
32
33
public enum class AnnotationTarget {
/** Class, interface or object, annotation class is also included */
CLASS,
/** Annotation class only */
ANNOTATION_CLASS,
/** Generic type parameter */
TYPE_PARAMETER,
/** Property */
PROPERTY,
/** Field, including property's backing field */
FIELD,
/** Local variable */
LOCAL_VARIABLE,
/** Value parameter of a function or a constructor */
VALUE_PARAMETER,
/** Constructor only (primary or secondary) */
CONSTRUCTOR,
/** Function (constructors are not included) */
FUNCTION,
/** Property getter only */
PROPERTY_GETTER,
/** Property setter only */
PROPERTY_SETTER,
/** Type usage */
TYPE,
/** Any expression */
EXPRESSION,
/** File */
FILE,
/** Type alias */
@SinceKotlin("1.1")
TYPEALIAS
}

同样在@Retention中的取值也值得注意:

1
2
3
4
5
6
7
8
9
10
11
public enum class AnnotationRetention {
/** Annotation isn't stored in binary output */
/** 注解只存在于源代码,编译后不可见 */
SOURCE,
/** Annotation is stored in binary output, but invisible for reflection */
/** 注解编译后可见,运行时不可见 */
BINARY,
/** Annotation is stored in binary output and visible for reflection (default retention) */
/** 注解编译后可见,运行时可见 */
RUNTIME
}

那么该如何使用注解,以@Deprecated修饰函数为例:

1
2
3
4
5
6
7
8
9
10
11
12
@Deprecated(
message = "请使用 newFoo() 代替",
replaceWith = ReplaceWith("newFoo()"),
level = DeprecationLevel.ERROR
)
fun oldFoo() {

}

fun newFoo() {

}

这里定义了两个函数,我们假装oldFoo()是过时的函数,需要用newFoo()来代替它,所以我们使用了@Deprecated来修饰oldFoo(),并补充了 3 个参数,包括关于废弃它的信息,以及应该用什么函数来代替,以及使用这个废弃的函数的严重程度。关于第 3 个参数,在这里定义的是DeprecationLevel.ERROR,这就代表使用这个函数会被编译器视为错误,从而无法通过编译。而当鼠标移到oldFoo()的调用处上面时,IDE 还会提供快速修复选项(如果有定义的话),在这里就是将oldFoo()替换成newFoo()

Kotlin 的注解还有一个细节就是注解的精确使用目标,例如在使用依赖注入框架时,如果去标记一个被var修饰的属性,那么编译器会报错,因为被var修饰的属性包含了属性背后的字段、getter、setter 三个含义,如果不明确标记其中之一,编译器根本不知道该怎么做。例如使用 Dagger ,要标记 setter ,那么只需要在属性上方插入:@set:Inject即可。除了 set 以外,Kotlin 当中还有其它的使用目标:

  • file:作用于文件
  • property:作用于属性
  • field:作用于字段
  • get:作用于属性 getter
  • set:作用于属性 setter
  • receiver:作用于扩展的接受者参数
  • param:作用于构造函数参数
  • setparam:作用于函数参数
  • delegate:作用于委托字段

反射

Kotlin 反射具备这三个特质:

  • 感知程序的状态,包含程序的运行状态和源代码结构。
  • 修改程序的状态。例如修改某个变量,即使这个变量是被private或者final修饰的。
  • 根据程序的状态调整自身的决策行为。例如 JSON 解析经常会用到@SerializedName这个注解,如果属性有@SerializedName修饰的话,解析时就会以指定的名称为准,如果没有,那就直接使用属性的名称来解析。

来看一个感知程序状态的简单案例:

1
2
3
4
5
6
7
8
9
10
11
12
13
14
15
16
17
18
19
20
21
22
import kotlin.reflect.full.functions
import kotlin.reflect.full.memberProperties

fun main() {
readMembers(Student("Aiden", 23))
}

class Student(val name: String, val age: Int) {
fun study() {}
}

fun readMembers(obj: Any) {
// 打印属性
obj::class.memberProperties.forEach {
println("${obj::class.simpleName}.${it.name} = ${it.getter.call(obj)}")
}

// 打印函数
obj::class.functions.forEach {
println("${it.name}()")
}
}

输出结果是:

Student.age = 23
Student.name = Aiden
study()
equals()
hashCode()
toString()

  • readMembers()接收了一个Any类型的参数,也就是任何类都可以通过反射来获取成员属性和函数。
  • obj::class叫类引用,是 Kotlin 反射的语法,通过该语法就可以拿到一个KClass接口,通过这个接口间接拿到实际的类的成员信息。
  • 通过调用memberProperties就可以拿到类的属性的集合,在这里利用forEach遍历集合就拿到了Student类中的name属性和age属性。值得补充的是,memberPropertiesKClass的扩展属性,定义于 Kotlin 的反射库中(需要在 Gradle 中引入这个库),而KClass是默认存在于标准库中的,也就是说,要想使用完整的反射,需要引入反射库。
  • 调用memberProperties返回的是一个集合:Collection<KProperty1<T, *>>KClass代表的是类的反射,而KProperty1就代表的是属性的反射了,通过调用KProperty1.name就可以拿到属性的名称,然后调用KProperty1.getter.call()就可以获取属性的值。另外这里的getter实际上是KProperty1中的属性,是Getter<T, out V>类型,而它又实现了KProperty.Getter<out V>接口,而它又实现了KFunction<out R>接口,而它又实现了KCallable<out R>,这就是可以调用call()的原因。

接下来是一个修改属性值的案例:

1
2
3
4
5
6
7
8
9
10
11
12
13
14
15
fun main() {
changeName(Student("Aiden", 23))
}

class Student(var name: String, val age: Int)

fun changeName(obj: Any) {
obj::class.memberProperties.forEach {
if (it.getter.call(obj) == "Aiden" && it is KMutableProperty1 && it.setter.parameters.size == 2 && it.getter.returnType.classifier == String::class) {
it.setter.call(obj, "Marcus")
println(it.getter.call(obj))
return
}
}
}

输出结果是:

Marcus

  • changeName()中遍历属性,并通过反射进行各种判断,包括但不限于:
    • 通过it.getter.call(obj) == "Aiden"判断属性的值是否为Aiden
    • 通过it is KMutableProperty1判断这个属性是否被var修饰;
    • 通过it.setter.parameters.size == 2判断如果要修改这个属性的话需要传几个参数,在这里是两个参数,一个是 obj 本身,另一个是新值;
    • 通过it.getter.returnType.classifier == String::class判断属性的返回值是否为String类型。
  • 接着通过setter.call()来修改属性值。不过在调用这个函数前还需要用it is KMutableProperty1来判断属性是否可被修改,否则就调用不了setter

Kotlin 学习笔记 - 基础
https://xuu6770.github.io/post/Kotlin-Study-Guide-Basic/
发布于
2023年3月4日
更新于
2024年9月5日
许可协议